Went shopping first today. I managed to break 2 of my big 1/2 inch drive sockets yesterday, so I went to Halfords with the intention of just buying 2 new sockets. After a bit of negotiation and a flash of the old Halfords trade card, I ended up buying a complete new Halfords Professional 1/2 drive set. Bargain price and its really good quality (plus another drawer in the cabinet filled too!)
Took out the rest of the suspension, mainly the steering rack and crossmember so the front is now totally empty and ready for cleaning and shutzing.
After a few hours of fiddling, the front struts are apart. Springs new powder coating, shocks are shot and the strut tops are unbonding. Thanks to Colin Radford I have a set waiting for me in Doncaster to collect so I just need some new thrust washers and gaiters and those will be ready.
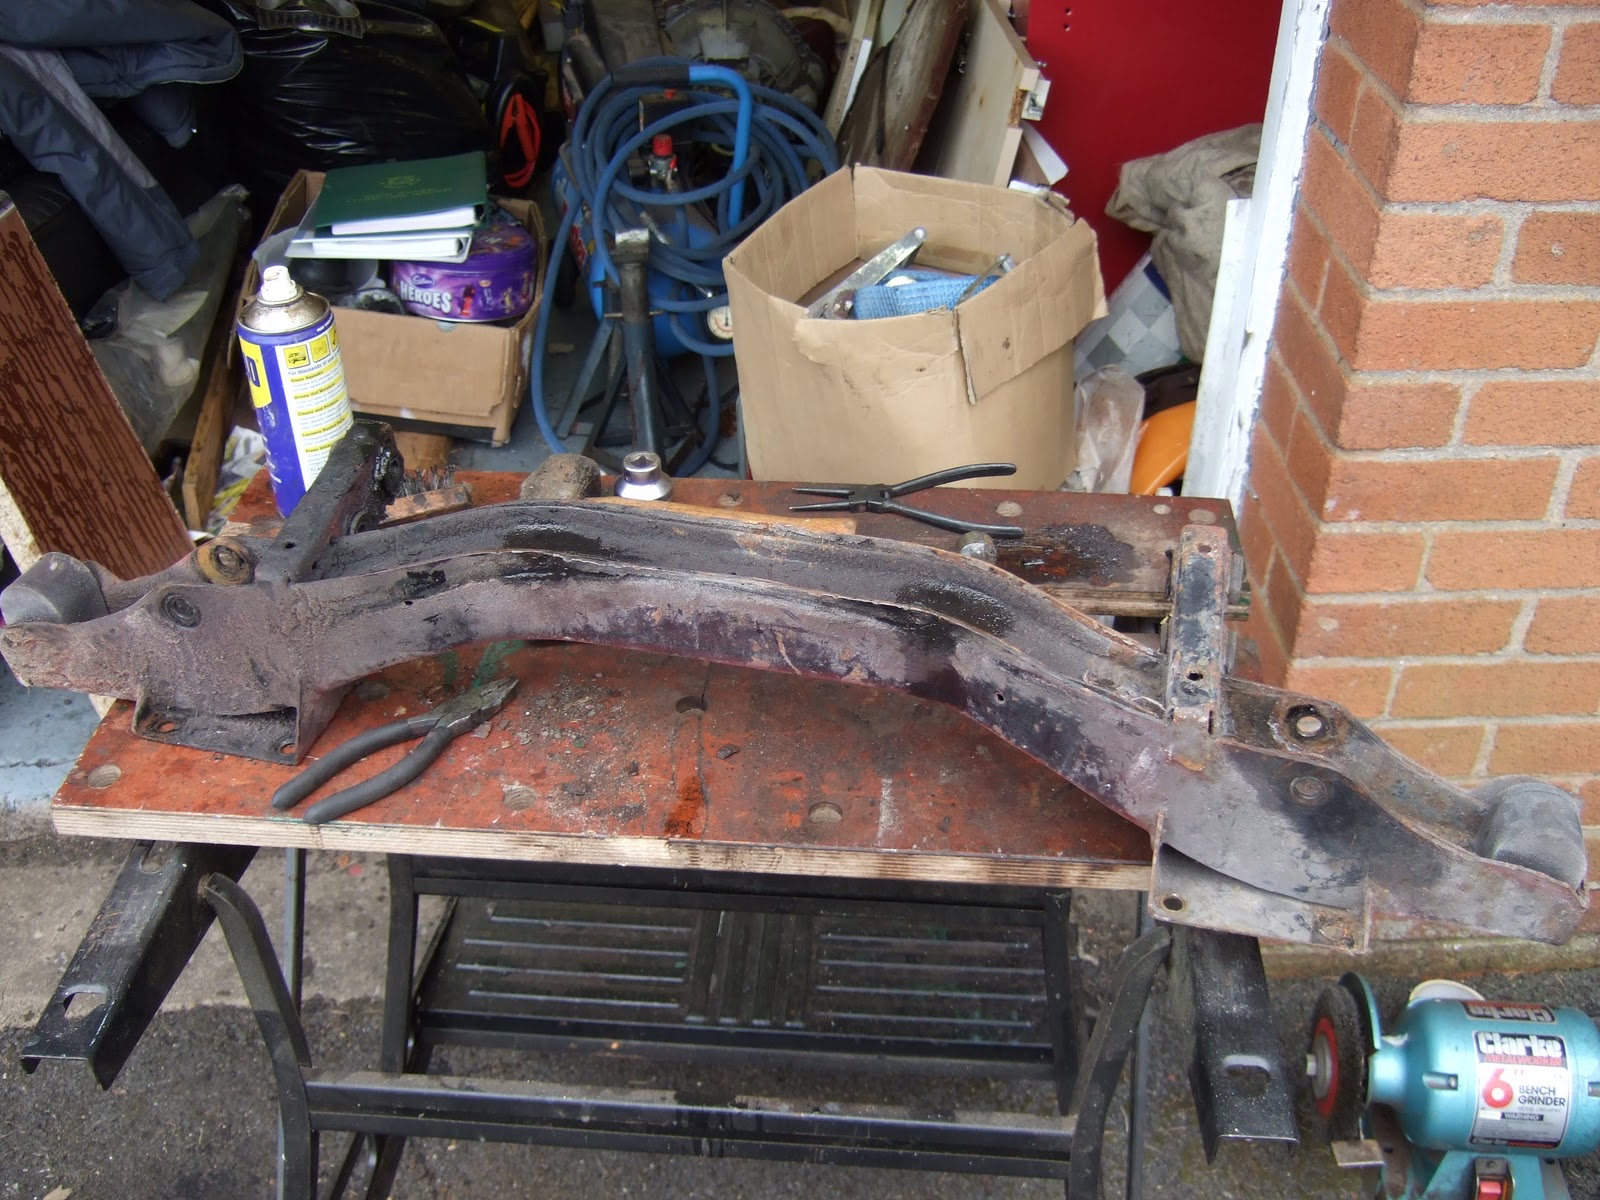
Once that was done I then stripped the crossmember down. Lots of small rivets holding the brake pipe clips to it (Stag system, so the n/s front brake pipe goes under the engine rather than behind it), the steering mount bushes (little swines those are I can tell you!) and the bump stops......... now it just needs powder coating.
Also stripped the tow bar down, so I now have a pile of bits to go to the blasters. Still need to get the ball joints out of the track arms and the seized bolt in the steering arm to hub so a trip to Brian's and some serious heat and a 10 ton press and we should be fine!
Sunday, 20 March 2011
Saturday, 19 March 2011
Front end stripping
Time to start stripping the front suspension down. Normally, I would have thought a couple of hours would have got this done............. oh how wrong I was! Every bolt was rusted, seized, rounded or just horrible... it fought me every step of the way! In the end, I got it all out with only one bolt holding the steering arm to the spider just not playing..... need to drop that in to Brian's and get some Oxy-acetylene on that I think! Now got another pile of bits for shot blasting, tomorrow I'll strip down the legs and get those ready to go.
The hubs and spiders I decided not to have powder coated, I just thought there is too much potential to get powder coat where you don't want it. So, I spent a happy few hours with the rotary wire brush until I got them clean...............
............. then a bit of masking and a few coats of spray smoothrite and they look as good as new!
In the end, the front end stripdown, excluding wire brush and painting took 5 hours!!!!!! 5 hours I ask you, why do we do these silly things?!?!
The hubs and spiders I decided not to have powder coated, I just thought there is too much potential to get powder coat where you don't want it. So, I spent a happy few hours with the rotary wire brush until I got them clean...............
............. then a bit of masking and a few coats of spray smoothrite and they look as good as new!
In the end, the front end stripdown, excluding wire brush and painting took 5 hours!!!!!! 5 hours I ask you, why do we do these silly things?!?!
Saturday, 12 March 2011
Rear finished, bit of bling, bit of polishing!
Busy day today. Got the rear end finished. Brakes built up with new shoes, springs and cylinders. New handbrake cable fitted with stainless fittings, Polybush spring mounts top and bottom, new coil over shocks, original powder coated springs, driveshafts coupled up and the brake lines finished.
Even though I'm trying NOT to build a show car, and I blame Mike Weaver for making me do it to this standard, I do have to say it looks superb! Mike is'nt making me do anything, but I love the way his car is turning out and I find myself trying to keep to a similar standard!!
I managed to pick up a rechromed fuel filler cap at Stoneleigh last weekend. Bit of a bargain as there a couple of ripples in the chrome...... not that you'd noticed unless you look closely! Built it up with the original lock and springs, just needs the inner seal, which I'd forgotten about and just ordered off fleabay!
Fitted the NOS number plate lamp chrome trim (another Stoneleigh bargain from Mr Dolphin) and then fiddled and fitted the NOS boot lock.
Then managed to get the new fuel cap in.................. oooooooooooooooo , shiney bits!
Gutter trims next. Mine were badly dented, but a salvaged set just needed cleaning up. The resident polisher Bradley seen here at work with the polishing mop in the bench grinder.
Even though I'm trying NOT to build a show car, and I blame Mike Weaver for making me do it to this standard, I do have to say it looks superb! Mike is'nt making me do anything, but I love the way his car is turning out and I find myself trying to keep to a similar standard!!
I managed to pick up a rechromed fuel filler cap at Stoneleigh last weekend. Bit of a bargain as there a couple of ripples in the chrome...... not that you'd noticed unless you look closely! Built it up with the original lock and springs, just needs the inner seal, which I'd forgotten about and just ordered off fleabay!
Fitted the NOS number plate lamp chrome trim (another Stoneleigh bargain from Mr Dolphin) and then fiddled and fitted the NOS boot lock.
Then managed to get the new fuel cap in.................. oooooooooooooooo , shiney bits!
Gutter trims next. Mine were badly dented, but a salvaged set just needed cleaning up. The resident polisher Bradley seen here at work with the polishing mop in the bench grinder.
Wonderful little tool this, from crusty to shiney in about 5 seconds!
The concentration on his face............. and they call me "the polisher" !!!!
Gutter trims on one side, had to modify the vinyl roof a bit, needed trimming back about 2mm just to allow the gutter trim to sit properly. Then we lowered the car down, pushed it outside and turned it round.
Then got the front up in the air ready to start stripping the front down
Crusty and 'orrible.......... this won't take too much to get it looking pretty.
The discs, apart from having surface corrosion, actually look like they were replaced not long before the car was laid up. No lip at all, so if anyone wants a decent set of MKII front discs that will probably be ok with a light skim, let me know! This is having Stag brakes on the front end so I don't need them.
I couldn't resist finishing off the day with a bit of bling. Bought a leather Mountey steering wheel off ebay, which cleaned up really well (only cost £10!), coupled to an astrali hub I had hanging about, with the front of a stag wheel to fit the badge......... that looks better!
Tuesday, 8 March 2011
Wheel clearance
Time to trial fit the wheels on the back. The recon driveshafts were fitted, drums bolted back on (no brakes or springs in yet) The brakes couldn't be fitted as I needed some adjusters (thanks Mike Weaver for supplying the correct set!) and I left the springs out so that I could lift the wheel into various positions to check the clearance on the wheel arches to determine the offset required for the 2nd set of wheels.
Brakes, springs and shocks next..................
Even if I do say so myself, these wheels do look good on here! Yes, I know it ought to have gold minilights on, but I just can't find anyone who will make them for a reasonable price and I just don't like them! I've always wanted a set of Revvies, so now I have got some!
There is about 20mm of clearance at running and full load heights, so I could get the wheels made with an extra 20mm of offset. Considered using some spacers, but then the wheel studs would need to be longer and I don't want to open that can of worms! They actually fill the arches quite nicely, and although I could get a set made further out, there is a clearance problem on the inner arch. Where it has been modified, it sloped down to meet the outer arch, and with the wheel space 20mm out, on full compression, it could foul the inner arch.
Thanks to Colin Radford who spotted this! So, this being the case, and the fact that they look just fine, shall be ordering another set identical to this and running with matches wheels (which makes more sense anyway.)Brakes, springs and shocks next..................
Saturday, 26 February 2011
Rear Suspension Part II
Fitted the new rear brakes lines and Aeroquip hoses, added a couple more clips to be safe!
Then, bolted the box sections to the diff nosepiece and then it was time to fit it!
Assisted by Bradley, as ever, had to wait for him to finish taking photos before we could get the whole assembly under the car!
We also managed to fish the wire down the inside of the tailgate for the number plate lights. Then cleaned (well, Bradley polished it to be honest!) the light assembly up and wired it up the screwed it in.
Then, bolted the box sections to the diff nosepiece and then it was time to fit it!
Assisted by Bradley, as ever, had to wait for him to finish taking photos before we could get the whole assembly under the car!
Then, built up the brake back plates. New wheel cylinders, clips and handbrake gaitors.
So, the back end is all ready to have the brakes built up, drivehsafts in, and then I can try the new wheels on the back to see how much clearance I have.We also managed to fish the wire down the inside of the tailgate for the number plate lights. Then cleaned (well, Bradley polished it to be honest!) the light assembly up and wired it up the screwed it in.
Wednesday, 23 February 2011
Wheels and Tyres
Well, busy and productive day today, if a little expensive! I was expecting a call anytime soon to say that the first 2 alloy wheels I ordered were ready for collection, so I have been thinking about tyres alot recently! The size I wanted (205/65/15) would keep the same rolling radius as 185/14 (i.e, original Stag Wheels) and they are a little expensive so I've been shopping around for the right deal. I was in Stoke on Trent for business today and on the way back I remembered a little independent tyre dealer I used to use when I was at University nearby in the mid 1990's. I managed to remember where it was and dropped in. They are still trading and they even remembered me! His opening words where, "That's a bit of an improvement to that old Triumph you had!".................... I decided not to judge him too much!
Long story short, he had a matched set of 4 on the shelf, and they had been ordered but never collected so he was willing to cut a deal on them. Not exactly high brand, but made under licence by Avon, so a decent make. All 4, in the boot of the Audi, £38 each! Bargain!
On the way back home the phone rang, and it was Revolution Wheels to say that my 5 spoke Revvies were ready for collection! Deep joy, especially as I was about 2 miles from the turn off for Tamworth! 10 minutes later I arrived at SCC/Revolution and handed over my credit card....... again! we had a chat and it turns out they make bottom ball joints for the Stag/2000 range on the same premises. As an apology for the 4 week wait (which didn't bother me, but I wasn't going to tell him that!) he gave me a pair! That's £25 saved then! We loaded the boxes into the car, which by now was getting rather full!, and I trundled home, determined not to look at the wheels until I got home.
Purists, look away now. This is final proof that there will be no gold minilights on my car! I am so chuffed with these, I have always wanted a set and now I have got the first 2 and I'm over the moon with them. they are going to look the mutt's nut's on Libby!
So, these are actually the one for the front in 7x15. I am going to reassemble and install the rear suspension (minus springs and shocks) and then fit these wheels and tyres on the back, to measure the new offset needed to fill the flared rear arches. Then I can order the rears from Revolution to get ones that fill the arches but don't catch. Ordered a set of nuts of fleabay to hold them on........ can't wait to get them on and see what they look like!
Long story short, he had a matched set of 4 on the shelf, and they had been ordered but never collected so he was willing to cut a deal on them. Not exactly high brand, but made under licence by Avon, so a decent make. All 4, in the boot of the Audi, £38 each! Bargain!
On the way back home the phone rang, and it was Revolution Wheels to say that my 5 spoke Revvies were ready for collection! Deep joy, especially as I was about 2 miles from the turn off for Tamworth! 10 minutes later I arrived at SCC/Revolution and handed over my credit card....... again! we had a chat and it turns out they make bottom ball joints for the Stag/2000 range on the same premises. As an apology for the 4 week wait (which didn't bother me, but I wasn't going to tell him that!) he gave me a pair! That's £25 saved then! We loaded the boxes into the car, which by now was getting rather full!, and I trundled home, determined not to look at the wheels until I got home.
Purists, look away now. This is final proof that there will be no gold minilights on my car! I am so chuffed with these, I have always wanted a set and now I have got the first 2 and I'm over the moon with them. they are going to look the mutt's nut's on Libby!
So, these are actually the one for the front in 7x15. I am going to reassemble and install the rear suspension (minus springs and shocks) and then fit these wheels and tyres on the back, to measure the new offset needed to fill the flared rear arches. Then I can order the rears from Revolution to get ones that fill the arches but don't catch. Ordered a set of nuts of fleabay to hold them on........ can't wait to get them on and see what they look like!
Sunday, 20 February 2011
Rear Suspension assembly
So, the plan for today was the re-assemble all the rear suspension and the refit to the car................. well, that didn't happen!
I under estimated how long it would take to put it all back together! Found the right brake pipe clips, snpped 3 but managed to get the 4 in I needed! Then assembled the exhaust hangers.......... what a fiddly job that is! Then it was the rear rubber mounts, 4 bolts, easy!
I got the diff nosepiece back from Witor's the other day, so that could be fitted to the diff and the back mounting plate bolted on.
After that I spend another hour or so trying to coax the number plate wiring down the tailgate and gave up when it started to get dark!! There must be a simple way to do this, but at the moment its evading me!!
Bend the brake lines to shape, they just need fitting then the rear suspension can go on..............
Subscribe to:
Posts (Atom)