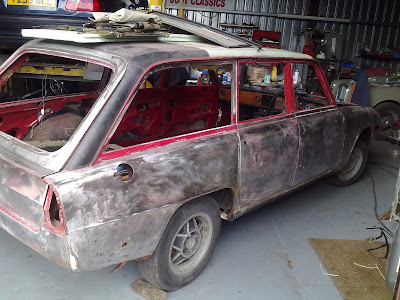
The rest of the car was now in bare metal, but all of the doors were off....... time to re-hang and set the door gaps. They were pretty horrible before, and much time was spent door on/door off/door on/door off until we had the gaps set just right.
Both sides are now finished. The passenger side sill was no where near as bad as the drivers side. Only needed minor repair work to the front and rear strengthener and a new outer sill. The pulled rear arch was pretty bad, just like the other side, but thats now all in new metal and lead.
The rear valance had some dents in, which are now tapped out and leaded. 2 new holes were drilled in the lower valance to take the twin electrics of the towbar wiring (originally had only one and in a silly place!)
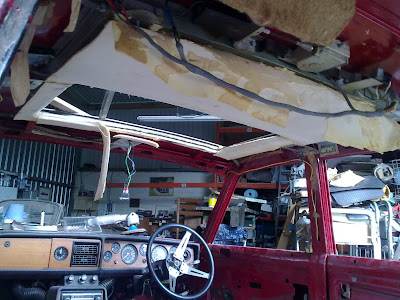
Now time to look at the sunroof. It is fitted with an electric steel sliding "Helandia" sunroof which was fitted by Bristol Coachworks. We were very concerned about this as the roof swage lines had been removed and judging from the previous bodges we found........ gulp! Also, the electrics had not been tested. All we knew is that it didn't sit shut properly, but it didn't leak. We found the power feed for the roof (unfused!!!....... that'll be changed then!) and powered it up from a slave battery, held our breaths and pushed the switch............ gentle hum of a motor and it slid fully open!!!! Ooooooooooooooooooooooooo yes!!. It won't shut though!!
So, with the roof open we could remove the rest of the vinyl roof (still no rust found!) and the tired black headlining. This revealed the conversion and some interesting fitment details. We were hoping to be able to drop the whole "cassette" out and work on it.......... only to find that its actually bonded to the roof and the metal bent round it......... so, its staying put then!
After much head scratching, we eventually found the hidden screws that allow the whole sliding section to be removed. Allowing the top bit to be trimmed in Vinyl and the bottom bit to be trimmed with the new headlining. We found all the relays and electrics and we think after some testing, its just a relay playing up, so it should be an easy fix. Powering up the motor directly and it works (open and shut) just fine.
So, finish of the rear arch, finish off the front arch, but more lead work and then its off to the painters!


