Monday, 2 September 2013

Wiring the Alarm and carpet painting

I managed to grab an hour this evening, don't the nights get dark quickly now! Still, managed to get a few things done. The next trim pieces inside to do are the sides of the front footwells and the parcel trays. Before I fit those I have some major wiring to do behind them, so I started that this evening.
The wiring is for the Alarm/Imobiliser and Remote Central Door locking system I am fitting. Running wires behind trim is always a pain, so easier to do it now before I refit them. First up hiding the wires for the infra-red sensors on the A posts.
 Then I found the ideal place to put the Red flashing LED. There was always a hole in the grill top and there is no speaker there due to the advanced "Quad Speaker System", so I popped it in the hole. Better then drilling another one I thought!
 Then I have this to deal with!! I need to find all sorts of feeds and connections so its just a case of working through each wire and finding a neat route. Looks awful, but its not finished yet!
 With the light fading I put another couple of coats of black carpet dye on the rear arches. They look so much better and nearly close enough I think.

Monday, 12 August 2013

More carpets and rear bumper (again!)

Monday evening spannering session! Managed to get to the Bolt Shop, and bought a few bolts I was missing. Got the missing one for the passengers seat, needed to be a little longer due to the extra layer of underlay I had put under the carpets. Popped the passenger seat back in.
 Moving on to the rear section, timmed and glued down the final side piece on the sills on each side, then put the rear treadplates back on. Still an awful fit, but 90% of it will be hidden by the rear seat.

 Next was the old problem of the rear arches. The original stuff is formed into a curve, the repro rubbish is a flat piece of carpet. When I stripped the car the rear arch carpets were in very good condition, but faded from black to a light brown (they all do that Sir,..........!) but, knowing how bad the repro stuff is and not wanting to tear them, I decided to leave them in place and mask them up during the whole process. Now they have been cleaned, they are still as good as I thought. So, a couple of light passes with a spray carpet dye, and we are getting somewhere. Another couple of coats needed but you can see where I have done, and compared to the black carpet next to it, its pretty close after 2 coats.

 Now onto a job I have been putting off for ages. When I put the towbar and rear bumper back on just before the NEC I knew something wasn't right, but couldn't put my finger on what it was. I then realised that the bolts that hold the towbar drop plate to the bar where the wrong size, too small and the bolts allowed the whole assembly to move. Not good as I am going to tow with this. But, getting the rear bumper to fit was a right pain due to the flared rear arches and I wasn't looking foward to taking it all off again. Bradley popped over to help as its really a 2 man job. These are the offending little bolts.
 We whipped the bumper and bar off, changed the bolts and then popped it back on.

 For some reason, this took about 4 hours last time we did this, this time........ 15 minutes flat!!! So much better, no movement, larger diameter bolts that fill the holes now. I am feeling much happier about this now.
 Next problem. As we tighten up the bolt to the quarter bumpers, the leading edge is getting closer and closer to the bodywork. Its all due to the flair of the rear arches and we had to stop before it was tight as it was going to hit. What I need is a couple of small spacers to drop between the body and the bumper bracket to hold the quarter bumper off the bodywork. I am NOT going to remove these bolts again, so I planning on getting some square section zinc plated steel with slots cut in so I can pull the bumper out, slot them over the bolt then tighten them up to hold it secure.

Restoring modified cars,............... sigh.......... one step forward, 3 steps back!!

Tuesday, 6 August 2013

Carpets Part II

Once again, girls are still with Sam's parents as she is away in London for the day, so I get an evening to myself again! Managed to get home and outside by about 7pm, so I knew it was a few small jobs before it got dark. First off was to fit the newly painted tailgate trim. Looks great!
 Then onto the main carpets. You will remember how I cussed the awful quality and fit of the repro carpets I got from Lincolnshire. Miek Weaver very kindly gave me a NOS main section and I have some NOS footwell carpets in stock so I knew I could make a better job! First of all, with the seats removed, have a look at these quality items........... dreadful!!!


 Ooops, upside down picture........ oh well, you get the idea...... this is the new piece of carpet.
 Fitted in minutes, few minor adjustments. It doesn't fit over the rear tranny tunnel as its now a different shape to the standard car due to the extra room for the Stag silencers. But, far better than before.
 Seats going back in, can't put the passengers back in as I remembered I was a bolt missing. Needs to be quite long so I have measured it and need a trip to the bolt shop!

2 hours well spent I think!

Monday, 5 August 2013

Headlight wiring again!

Once more I manage to find a couple of hours to work on the car this evening. Only problem was, it was persistently chucking it down! Not really suitable weather for taking the car out of the garage and continuing with interior work!
I looked at my "to do" list and found a nice simple job I could do. In my haste to assemble the front end fo the NEC I had managed to route the new wiring loom for the headlights (relays now) in the wrong place, so it hung down rather than being clipped up. So, I thought I would resolve that. 
Needed all the new wiring carefully labelling, snipping, re-routing properly and then reconnecting the wires with proper connectors and heat-shrink tape. Looks much better now and doesn't have wires hanging infront of the radiator!

 I also managed to re-align the main beam headlamp bowels as I have managed to fit them wrong so that the lights were slightly on an angle. The "Halogen" lable now sits properly.
 It has uncovered another problem though. I found this wire on the main loom in the middle of the radiator. What is it for? Looks like original as its in the loom, but I can't seem to find it on the wiring diagram! Any ideas?
EDIT, just found out via the 2000 Register Forum, its a feed for front fogs if fitted. So, I'll blank it off and tuck it away.

Monday, 29 July 2013

It's been a while............

Well, that was a longer break than I expected!!  I just have not found any time to get Libby out of the garage and do some work. What with the girls, work and Sam's work........ not to mention putting our house up for sale, has meant that time has just slipped by.
However, its the school summer holidays so it means on a Monday evening the girls are staying at Sam's parents for the night...... so I get a night off! Home at a sensible time, so I vowed I would spend some time on the car even if it was only an hour!!
I pushed her out of the garage and spend a while looking and thinking and trying to work out what ought to be done next.
 The front door tread plates were horrible and bent and Andy Roberts had kindly donanated a good used pair with no dents. So, a polish and they fitted nicely.

 Then spent about half an hour unseizing the rear seat belt mountings so I could glue the carpet back around them.
 Then I cut and made the rear crossmember carpet fit, got that looking somewhere near fitting (bloody Rimmers carpets!!!) and glued it in place.
 I found from stock a NOS tailgate trim panel, but in the wrong colour. Masked up the trims and sprayed it with black vinyl paint. Left it to dry for a while and hey presto..........
 ........................a black one!!
 Ran out of daylight, not much done but every piece put on is one less to go!


Other changes since I last blogged, said farewell to my faithful Audi a couple of months ago. Slightly upset at seeing it go after 139,000 miles together, but also because this was the car we brought the girls home in.
But, its not all bad as this is its replacement!!

 Promise, more later (without such a big gap hopefully!!)


Monday, 19 November 2012

NEC Show

I have had many messages, texts and emails over the past few weeks asking why there have been no blog updates for a while. People knew I was working frantically on the car and wanted to know what was happening!
Libby had been invited to be displayed on the Triumph 2000/2500/2.5 Register club stand at the NEC Classic car show, and I wanted to move her along quite a bit so it looked more complete for the show but I decided I would like it to be a bit of a surprise as to how far I had got. Even the Register Show Organisers didn't know as I wanted to keep them in suspense!
But now the show is over (and what a wonderful show it was!) here is the work in the days before.
The list sounds quite short, but the hours it took...........ooooooooh! Several late nights were spent on this and even more £££, but its all worth it!
Headlamps, wired in with relays, new Cibie Oscar units fitted, grill polished and refitted.

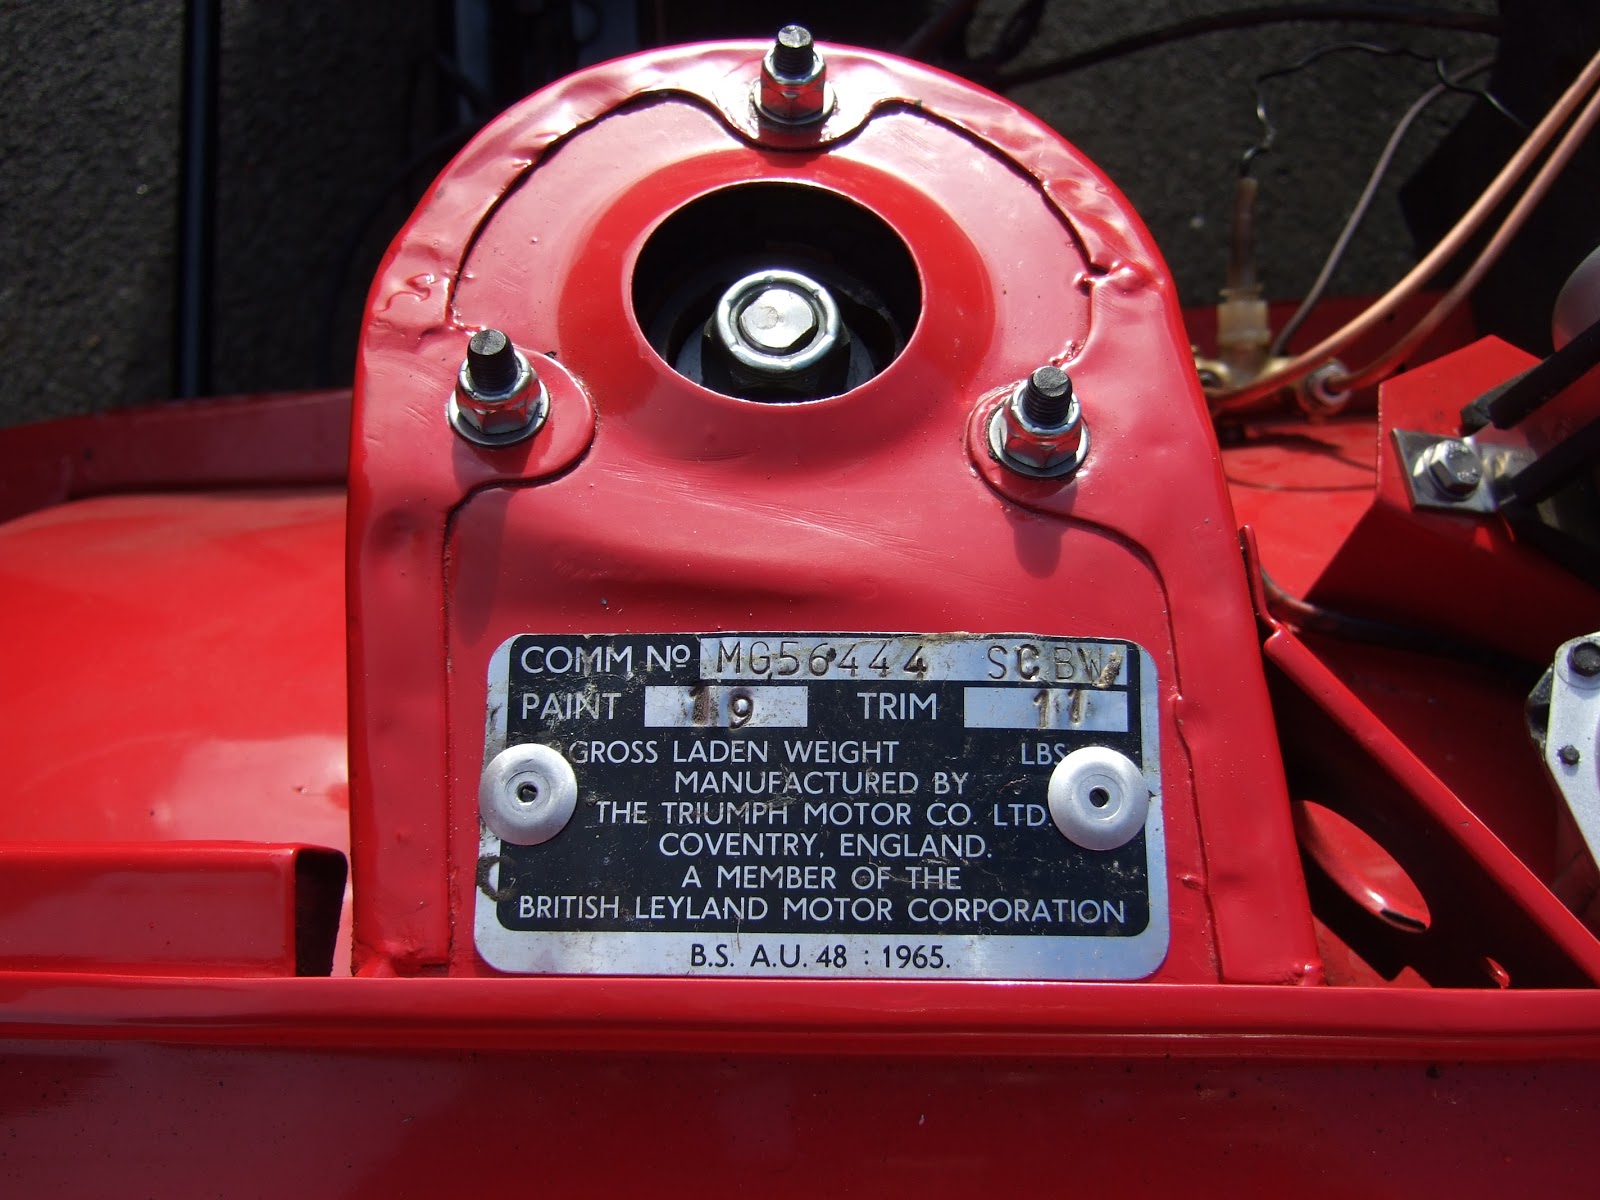
 Original chassis plate cleaned and refitted.
 Last section of brake pipe fitted, brakes bled, handbrake set (to stop it rolling off the stand!)
 Towbar wiring laid in, extra heavy duty cables front to back to allow for split charge relays for towing a modern caravan. Original towbar refitted.
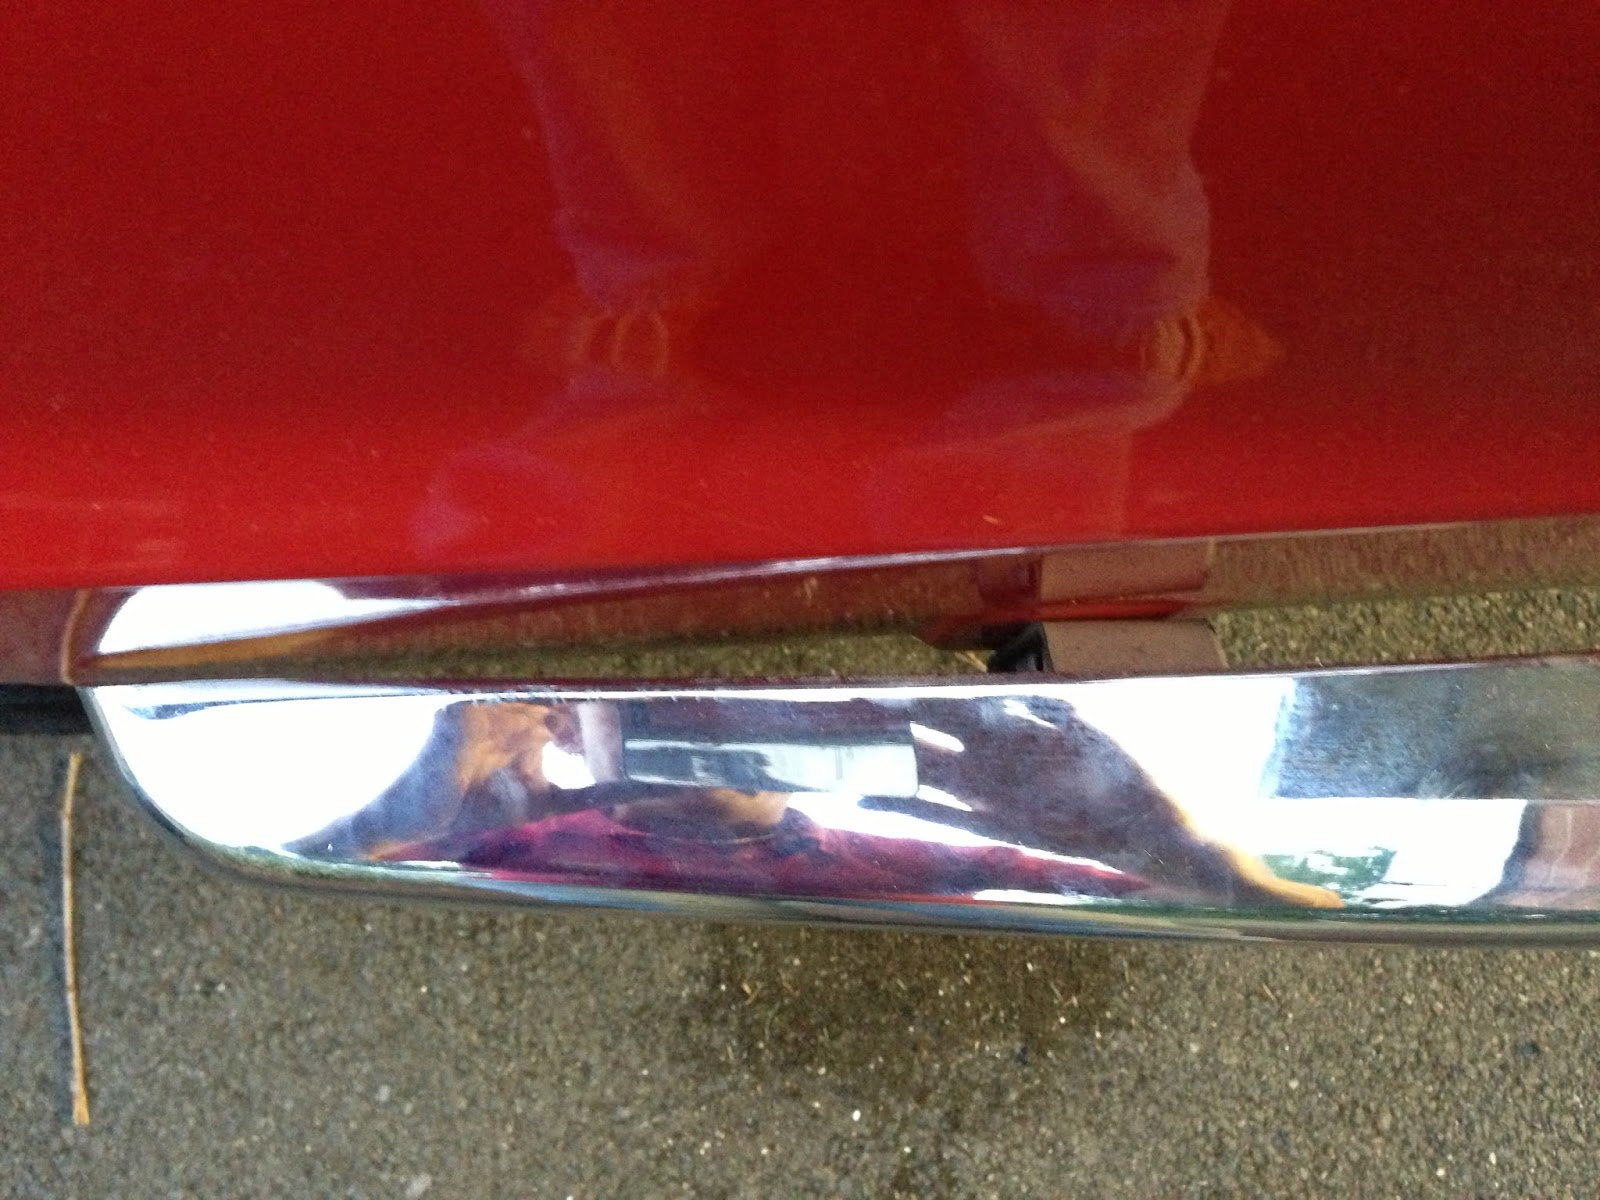
 After much swearing the NOS rear bumper was fitted. Slight alignment issues due to the flared rear arches. Its on, but needs fettling with some spacers on the quarter bumpers as when tightened it will touch the flare of the arch at the back.
 Good secondhand front bumper fitted with new stainless bolts and brackets. Then cleaned and polished by Bradley!
 Front carpet sections fitted and newly trimmed original Recaro seats refitted. The carpet set I bought from Rimmers as they had stock. I was shocked by how bad this was, it just does not fit!  Mike Weaver to the rescue so I now have a NOS main section, along with my NOS front footwel carpets to fit later this should sort the problems out. For the moment the badly fitting Rimmers set are in for the show. At the NEC I had one of the Rimmers managers look at the carpets and he got short and terse words from me about the awful fitting of the carpets.
 Clutch pedal a bit high........... due to no clutch master cylinder fitted yet! Temporary blue wires by gear lever (missing!) to allow a slave battery to put the drivers side electric window up and down for loading on and off the trailer.
 Rear complete with badges, new number plates (With Atlantic Garage details on the bottom, nice touch I thought!) and the new Stainless steel Stag large bore tailpipes fitted.......... for effect for the show only, obviously no exhaust fitted yet until the engine and gearbox are in.
 Loaded on the trailer ready to show!

 at the NEC...... under the spotlights it did look a little orange, but that is just the weird lighting there!
As usual, many thanks to Bradley for the hours of help. To Colin & Amanda for inviting me to display it and giving me the push needed to get it moving along at this rate, to Mike Weaver for refitting the windscreen trim at the show and providing the NOS carpet section, and to everyone at the show who appreciated the hard work................ its you lot out there giving me the encouragement to finish this, thank you!

Saturday, 27 October 2012

Glass fitting

Glass fitting day today, to get it watertight ready to go to the NEC. Mike Weaver very kindly offered to come and fit my windscreen as he's done quite a few now and has the knack (and the tools!).  First thing this morning got the "shop" ready. Car, Glass, Seal, Silicone lubricant, tape, white spirit and cloths. Brian also came round to help to have a look at the estate side windows as I just couldn't see how they would fit.

 I was amazed how quickly it took to actually get the screen in. Most of the time was spent re-doing the piss poor prep work I'd done............. okay, so now I know ALL the old glue has to be removed from the A Post trims first!
 Before long it was in, then started the really nasty job of injecting the sealant in between the glass and the rubber. Not a nice job, but not as bad as the clean up afterwards. I have some more detailed cleaning to do after a week or so when the sealant has gone off properly, but apart from that its in and looking great!
 The side windows were more of a puzzle. We now think that the modifications Del Lines did to the rear wings may have changed the profile of the window, they just did not want to fit. In the end some brute force and ignorance was needed. Brian and Mike supplied the brute force, and I helped with my ignorance!
 Just got to do some build up work with silicone on one corner where we tore the rubber a bit.
 Trims polished and on.
 All glass in, car watertight.
Huge HUGE thank you to Mike Weaver and Brian Chrimes for today, there as no way I could have done this job without them!